
Lower back pain is a pesky problem that unfortunately, many of us have experienced at one point or another to some degree. For most, its lack of inactivity and for some, it might be related to a form of injury. For those who are cleared to engage in lower back exercises by their physicians, they can perform various exercises to help strengthen their lower back muscles and reduce or completely get rid of their lower back pain.
The good thing is that you don’t need any equipment’s to perform these exercises, so grab a mat and get to work. Also, we highly recommend looking into Yoga exercises to help work muscles that you normally won’t train during regular workouts. Here are some yoga exercises that you can do to build strength.
Below, we will explain how to do 15 exercises at the comfort of your home that will help strengthen your lower back and help reduce your pain:
-
BRIDGES

- Lie on the ground and bend the knees, placing the feet flat on the floor hip-width apart.
- Press the feet into the floor, keeping the arms by the sides.
- Raise the buttocks off the ground until the body forms a straight line from the shoulders to the knees.
- Squeeze the buttocks with the shoulders remaining on the floor.
- Lower the buttocks to the ground and rest for a few seconds.
- Repeat 15 times and then rest for 1 minute.
-
PARTIAL CURLS

- Lie back on the floor and bend the knees, keeping the feet flat and hip-width apart.
- Cross the hands over the chest.
- Breathe in deeply.
- On the breath out, engage the abdominal muscles by pulling in the stomach.
- Gently raise the head and shoulders 2 inches off the ground while keeping the neck in line with the spine.
- Hold for 5 seconds then return to the starting position.
- Repeat the exercise 10 times.
-
LOWER BACK ROTATIONAL STRETCH

- Lie back on the floor with bent knees and feet flat on the ground.
- Keeping the shoulders firmly on the floor, gently roll both bent knees over to one side.
- Hold the position for 5–10 seconds.
- Return to the starting position.
- Gently roll the bent knees over to the opposite side, hold, and then return to the starting position.
- Repeat 2–3 times on each side twice a day.
-
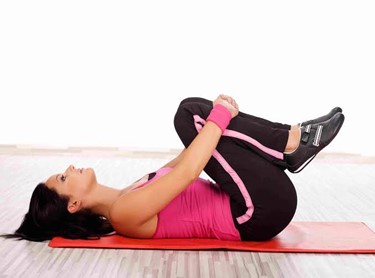
HAMSTRING STRETCHES
- First, lie on your back with one knee bent.
- Next, thread a towel beneath the ball of the foot on the unbent leg.
- Pull back on the towel slowly, straightening your knee. You ought to feel a gentle stretch along the back of your leg.
- Hold the stretch for at least 15-30 seconds.
- For each leg, repeat 5 times.
-
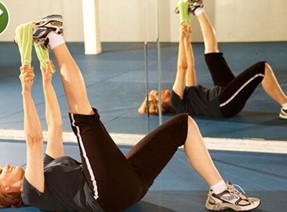
TABLETOP LEG PRESS

- Lie face up with your legs raised in a tabletop position (knees bent 90 degrees and stacked over your hips).
- Contract your abs to press your low back into ground. Crunch up just a few inches and place your hands on the front of your quads.
- Drive your quads into your hands while simultaneously pressing them away. There should be no visible movement in your body.
- Hold this position.
-
BIRD DOG
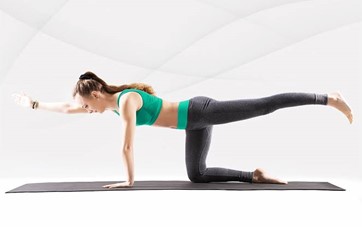
- Start on your hands and knees in tabletop position with your wrists stacked under your shoulders and your knees stacked under your hips. This is starting position.
- Extend your right arm forward and left leg back, maintaining a flat back and keeping your hips in line with the floor. Think about driving your foot toward the wall behind you.
- Squeeze your abs and return your arm and leg to starting position.
- Continue this movement for 30 seconds. Then, repeat with the other arm and leg.
-
FOREARM PLANK

- Rest your forearms on the floor, with your elbows directly underneath your shoulders and hands facing forward so that your arms are parallel.
- Extend your legs out behind you and rest your toes on the floor. Your body should form one straight line from your shoulders to your heels.
- Squeeze your entire core, your glutes, and your quads, and tuck your butt under a little to keep your lower back straight.
- Position your head so that your neck is in a neutral position and your gaze is on your hands.
- Hold this position.
-
CLAMSHELL

- Lie on your left side with your elbow bent. Use your left hand to prop up your head.
- Stack your right leg and foot on top of your left, and bend your knees to form a 45-degree angle. Place your right hand on your hip or lightly on the floor in front of you for balance.
- Slowly lift your right knee up toward the ceiling, keeping your feet touching. Use your glutes to initiate the movement, and squeeze them as you lift.
- Lower your right leg back to meet the left.
-
SQUAD SUPERMAN

- Begin on all fours.
- Raise your right arm and left leg straight up to shoulder height, then slowly lower both back to the ground.
- Raise your left arm and right leg straight up to shoulder height, then slowly lower both back to the ground.
-
MODIFIED SUPERMAN

- Starting position: Lie face down, hips on the floor, legs straight, arms by your sides, and palms up.
- Keeping your belly button on the floor, raise your upper body, arms, and legs all together, about 18 inches, for a count of about 2 seconds. Take care not to look up and hyperextend your neck but rather keep your chin tucked with a straight neck.
- Hold this position for about 2 seconds, then lower yourself back to the floor and repeat.
-
ONE LEG FRONT BRIDGE

- Starting position: Support your body with your toes on the floor and your hands on a ball directly under your chest. Stomach tight, arms straight, pelvis square.
- Raise your right leg straight up off the floor about 12 inches, keeping your body in a straight line and your back in a flat, neutral position, then bring your toes back down to the floor.
- Complete all leg lifts on the right leg before switching to the left leg.
-
KNEE TO CHEST
- Lie on your back. Put your feet flat on the floor and bend your knees.
- Draw your right knee up to your chest. Keep the left foot flat against the floor.
- Hold for 15-30 seconds. Keep your lower back flat on the floor.
- Next, lower your right knee. Repeat the routine with the left leg.
- For each leg, perform knee-to-chest two to four times.
-
PRESS-UP FRONT EXTENSION

- Lie on your stomach. Position your hands directly underneath your shoulders.
- Push down on your hands. You should feel your shoulders begin to lift away from the floor.
- If you can do so comfortably, set your elbows on the floor directly beneath your shoulders. Then spend several seconds holding this position.
- The bird dog is a great exercise to stabilize the low back.
-
GLUTE BRIDGE

- Lie on your back with your hands at your sides, knees bent, and feet flat on floor hip-width apart.
- Squeeze your glutes and abs and push through your heels to lift your hips a few inches off the floor until your body forms a straight line from your shoulders to your knees. Hold this position for a second, making sure your knees stay straight and don’t collapse in.
- Slowly lower your hips to return to the starting position.
-
DEAD BUG

- Start by Lying face up with your arms extended toward the ceiling and your legs in a tabletop position (knees bent 90 degrees and stacked over your hips).
- Slowly extend your right leg out straight, while simultaneously dropping your left arm overhead. Keep both a few inches from the ground. Squeeze your butt and keep your core engaged the entire time, lower back pressed into the floor.
- Bring your arm and leg back to the starting position.
Lower back pain is one of the most common forms of chronic pain among adults. Movement can help relieve back pain, but only the right kind; avoid workouts that put too much stress and strain on the back and always consult a physician prior to engaging in any sort of exercise routine, especially if you have chronic back pain or pain related to an injury.